
|
Problem: You keep typing 4th, but Word insists on displaying 4th. Because Word automatically changes ordinals into superscripts, your citations do not comply with the Bluebook’s required format. Solution: Disable the AutoFormat As You Type option that automatically superscripts all ordinals. Explanation: AutoFormat As You Type automatically configures text for designated text as you type. For example, AutoFormat As You Type will change "straight" quotes to “smart” quotes, superscript ordinals from 4th to 4th, change double hyphens -- to dashes –, and format bulleted lists. Word’s default settings enable many AutoFormat As You Type options. 
To access the AutoFormat As You Type Tab, take the following steps: Word for Windows:
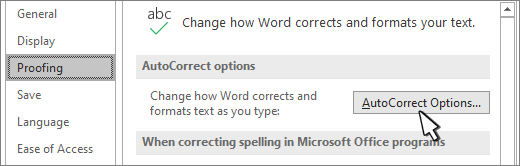
1. Go to File > Options > Proofing and select AutoCorrect Options.
2. Select the AutoFormat As You Type tab. Word for Mac:
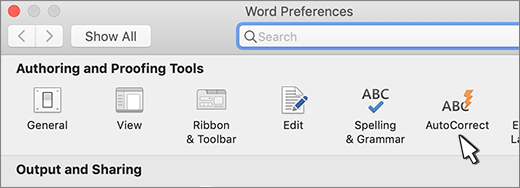
1. On the Word menu, select Preferences, and then AutoCorrect.
2. Select the AutoFormat As You Type tab. Learn more about AutoFormat As Type here. Pro Tip: If you do not wish to disable an AutoFormat As You Type option for all of your documents, you can manually override the AutoFormat As You Type option each time you type the relevant text. To do so, directly after Word AutoFormats your text, use Ctrl + z (Windows) or Command + z (Mac) to “undo” the AutoFormat.
|
|
Problem: I INADVERTENTLY LEFT MY CAPS LOCK ON, AND I DRAFTED A WHOLE PARAGRAPH USING UPPERCASE LETTERS. Solution: Rather than retyping your text, use the Change Case button |
|
Pro Tip #1: Carefully proofread your text after you use the Change Case feature. This feature will save you time in the long run, but it may not change the capitalization exactly as you wish it to be changed. For example, you will still need to review your text to make sure that the single letter “i” remains an uppercase letter.
Pro Tip #2: The Font Dialog Box provides you with additional options for changing the appearance of your font. For example, you may use this dialog box to
 Click on image to enlarge |
Problem: You now frequently use § and ¶ in your writing. Manually inserting these symbols each time you need them is too much trouble and takes too much time.
Solution: You have two options: (1) use AutoCorrect to change a sequence of keystrokes to your symbol, or (2) assign a shortcut keys to symbols that you frequently use.
Explanation: Whether you chose to insert symbols using AutoCorrect or a shortcut key will likely depend on whether you prefer to remember a sequence of keystrokes (AutoCorrect) or a combination of keys (shortcut keys). For a step-by-step tutorial, review the boxes below based on your operating system.
Additional Information:
AutoCorrect will replace text as you type. Therefore, you can tell Word to automatically replace a word or a sequence of keystrokes with a symbol. For example, each time you type (s), Word will autocorrect it to §.
Step 1: On the Insert tab, click on the Symbol listbox and then select More Symbols.

Step 2: In the Symbols Dialog Box, select Special Characters > section symbol > AutoCorrect.

Step 3: The AutoCorrect box will appear. Locate the Replace ___ With ___ boxes in the middle. In the first box, enter the word that you want Word to AutoCorrect to §. The second box already includes §, which will replace your selected word. Select Add and then Ok.

Use a shortcut key to quickly add a symbol to your text.
Step 1: On the Insert tab, click on the Symbol listbox and then select More Symbols.
Step 2: In the Symbols Dialog Box, select Special Characters > section symbol > Shortcut Key.

Step 3: In the Press new shortcut key box, type the combination that you want to use for §, and then click Assign and Close.

AutoCorrect will replace text as you type. Therefore, you can tell Word to automatically replace a word or a sequence of keystrokes with a symbol. For example, each time you type (s), Word will autocorrect it to §.
Step 1: On the Insert tab, click on the Advanced Symbol box to the far right.

Step 2: In the Advanced Symbols Dialog Box, select Special Characters > section symbol > Insert.

Step 3: In the Press new shortcut key box, type the combination that you want to use for §, and then click Assign and Close.

Step 4: The AutoCorrect box will appear. Locate the Replace ___ With ___ boxes in the middle. In the first box, enter the word that you want Word to AutoCorrect to §. The second box already includes §, which will replace your selected word. Select Add.

Use a keyboard shortcut to quickly add a symbol to your text.
Step 1: On the Insert tab, click on the Advanced Symbol box to the far right.
Step 2: In the Advanced Symbols Dialog Box, select Special Characters > section symbol > Keyboard Shortcut.

Step 3: In the Press new keyboard shortcut box, type the combination that you want to use for §, and then click Assign and OK.

|
Problem: You know that the court rules and the course policies establish margin requirements for your document, but you can’t figure out how to ensure that your document conforms to those requirements. Solution: Word automatically sets a one-inch page margin. If the court rules or the course policies require different margins, use the Margins gallery on the Layout tab to modify your document’s margins.

Tutorial: Change Margins (includes video) Pro Tip: If you are uncertain about your document’s margins, you can check them within the Page Setup Dialog Box on the Layout tab. As an alternative to using Word’s preset margin options identified in the explanation above, you can also modify your document’s margins from the Page Setup Dialog Box.
 |
Problem: I need a quick tutorial on paragraph formatting in general.
Solution: Microsoft has a one minute video and accompanying written instructions for that! The video and written instructions include the following topics:
Problem: Most of my document should be double spaced, but I need some parts to be single spaced, such as my headings and block quotes.
Solution: Start out by double spacing your document. From the Design tab, select the paragraph spacing drop down menu and select Double. Note that this tab also gives you six other spacing options, including a “tight” paragraph that eliminates the space between paragraphs. Next, select the text that you want to be single spaced. From the Home tab, select the Line and Paragraph Spacing button  in the Paragraph box, and select 1.0 spacing.

Tutorials

Problem: You are beginning to draft your document, and you want the first line of each paragraph to include an indent.
Solution: Type your first paragraph. Put your cursor at the beginning of the paragraph and press the tab key on your keyboard. Then put your cursor at the end of the last sentence in the paragraph and press the enter key on your keyboard. The first line of each paragraph that you then draft will include a first line indent.
If you have already drafted your document, your most efficient option is to highlight your document (ctrl + a), and on the Home tab, select the Paragraph dialog box  . Choose the Indents and Spacing tab. Under Indentation, find the Special dropdown and select First Line. Select OK.

If you wish for all of your documents to include first line indents, you can modify the Normal style on your Styles tab (see Tutorial below).
Explanation: When you include a first line indent, the first line of your paragraph is indented by a half tab more than the remaining lines in your paragraph. First line indents help your document to more visibly set off paragraph breaks, which enhances your document’s readability. You can easily add a first line indent manually by using the tab button on your keyboard. However, the most efficient way to add a first line indent is to allow Word to automatically creates a first line indent each time you begin a new paragraph.

Problem: Word defaults to left alignment, which means that the text lines up flush with the left margin. However, your supervisor prefers text to be fully justified, meaning that the text lines up flush with the left and right margins.

Solution: On the Home tab, in the Paragraph section, click on the Justify button. If you have already started drafting, select the text that you have drafted before you click on the Justify button.
Explanation: The Paragraph section provides buttons for the most common types of paragraph alignment.
Tutorial (including instructions on alternative methods for adjusting your document’s alignment):
Problem: You’d like to create a list to visually offset information within your document, and you’d like all of your information to align uniformly.
Solution: Create a bulleted or numbered list.
Explanation: If you are starting with a blank document, place your cursor where you would like the bulleted or numbered list to appear. From the Home tab, click the arrow next to Bullets or Numbering, select the style you would like, and start typing.
If you have an existing list, highlight that list with your cursor. From the Home tab, click the arrow next to Bullets or Numbering, select the style you would like, and Word will apply your choice to the highlighted text.

You can also create a multilevel list by using the tab key to indent the text you select.
Tutorial:
Problem: You’ve included a bulleted or numbered list in your document, but you would prefer for the spacing between the bullets and the text to be smaller. You anticipate wanting to make other formatting changes, too, but you’re going to tackle those issues as they arise.
Solution: You can adjust the list indents by selecting the bullets or numbers, right clicking, and selecting Adjust List Indents. You could also adjust the indents manually by sliding the arrows on the ruler at the top of your document, but that method would apply to only one number or bullet, and not your list as a whole.
Explanation: You can control the appearance of your list in many ways, including adjusting the list indents, adjusting the space between items in your list, changing the bullet style, and changing the starting number in the list.

Tutorials:
Problem: You would like all or a part of your document’s text to align on the page differently than Word’s formatting presets.
Solution: Use the Ruler to set tabs in the locations on the page where you want your text to align. Simply click the location on the Ruler where you want the tab to appear.
Explanation: Tabs control the placement of text. You can set different kinds of tabs: left, middle, right, decimal, and bar tabs. To view the Ruler at the top of your document so that you can easily set tabs, select the View tab, then check the Ruler box within Show. To clear or remove a tab, drag the tab off the Ruler.

Tutorials:
Problem: You’ve copied text from another document, but when you paste that text into your own document, the text retains its original formatting, which then alters your document’s formatting.

Solution: Use the Paste Options button  , which appears above your text when you paste it. Word will generally provide you with three options: Keep Source Formatting, Merge Formatting, and Keep Text Only. Hover your cursor over each option to see how your text will appear when you select that option.
Select Keep Text Only to paste your text without its original formatting, and Word will conform the pasted text to your document’s text.

If your text has emphasis that you wish to retain, select Merge Formatting, and Word will keep the emphasis but conform the pasted text to your document's text.
Tutorial:
|
Problem: Information that needs to stay together on the same page—like your signature block—is split between two pages. Solution: You could use the Enter button to push onto the next page the information that you need to keep together. However, this method could create formatting issues when you later edit your document because adding or deleting text will move the text that falls below those edits. Instead, use a page break to push the text onto the next page.   Tutorial: |
|
Problem: Your document includes a blank page at the end that you can’t get rid of.
Solution: Documents sometimes contain a non-deletable end paragraph that spills onto the last page, thus causing the document to end with a blank page. You can delete the blank page if you can fit the end paragraph onto the preceding page. Explanation: Sometimes, deleting a blank page is as easy as selecting all of the lines on the page and hitting the backspace or delete button. Other times, deleting the last page can be more complicated because your document includes coding that may not be visible to you. Tutorial: Delete a Page in Word |

|
Problem: You know that the court rules and course policies require you to number the pages in your document, but you don’t know how to efficiently include page numbers. Solution: From the Insert tab, use the Page Number button within the Header & Footer section.  Tutorial: Insert Page Numbers (including a video) Pro Tip: The first page of your document doesn’t always need a page number if it’s self-evident that the first page is the first page. Word allows you to omit the first page number. The tutorials provided above each address how to omit the first page number from your document.
|
 on the Home tab to change the text of your sentence from uppercase to sentence case.